Difference between revisions of "NeuroMD SDK Manual"
(→Appearance of the sensor "Callibri") |
(→SDK manual) |
||
| Line 34: | Line 34: | ||
'''1. Power button''' [[File:4.png|thumb|right]] | '''1. Power button''' [[File:4.png|thumb|right]] | ||
| − | '''2. | + | '''2. Red indicator''' |
| − | '''3. | + | '''3. Green indicator''' |
'''4. Cutout in the sensor for tape attachment''' | '''4. Cutout in the sensor for tape attachment''' | ||
| Line 42: | Line 42: | ||
'''5. Contact areas''' | '''5. Contact areas''' | ||
| − | '''6. USB connector | + | '''6. USB connector for the charger''' |
| + | |||
| + | ==Start and finish of work== | ||
| + | |||
| + | Press the power button for turning on /off the sensor (1). | ||
| + | |||
| + | ==Charging== | ||
| + | |||
| + | For charge the sensor, align the sensor's USB connector (6) with the USB cable of the charger. Connect to power supply. | ||
| + | |||
| + | [[File:5.png]] | ||
=Using the SDK= | =Using the SDK= | ||
Revision as of 08:16, 26 January 2018
SDK manual
Introduction
Wireless sensor "Callibri" is a multifunction device that can be used for:
1) registration of various biopotentials (electromyograms, electrocardiograms, cardiointervalograms);
2) for recording the angular velocity and acceleration (MEMS);
3) the formation of electrostimulating effects and correction of violations of the human muscular system.
The principle of wireless communication is provided using the Bluetooth LE radio channel between the sensor and the device (mobile phone, etc.) The advantage of wireless registration is to minimize motor artifacts and, as a consequence, to ensure the free position of the subject's body, including the ability to move. Based on the sensors "Callibri" with the use of SDK, you can create:
- neurointerfaces based on Biological feedback;
- a system for assessing the quality of training in fitness and sports;
- applications based on the registration of EMG, EEG, ECG (no more than 4 channels).
Signs used in this manual
![]() Warning - indicates situations or actions that are dangerous to the user;
Warning - indicates situations or actions that are dangerous to the user;
![]() Attention - indicates situations or actions that could lead to damage to the device / other equipment or its misuse;
Attention - indicates situations or actions that could lead to damage to the device / other equipment or its misuse;
![]() Note - recomendation and additional information.
Note - recomendation and additional information.
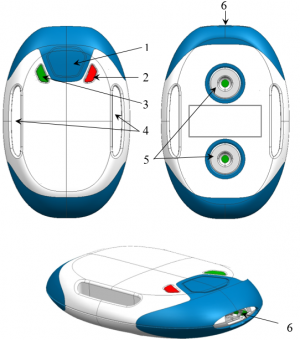
Appearance of the sensor "Callibri"
1. Power button2. Red indicator
3. Green indicator
4. Cutout in the sensor for tape attachment
5. Contact areas
6. USB connector for the charger
Start and finish of work
Press the power button for turning on /off the sensor (1).
Charging
For charge the sensor, align the sensor's USB connector (6) with the USB cable of the charger. Connect to power supply.

