Difference between revisions of "Binaries and downloads"
(→Base SDK versions) |
NateColeman (talk | contribs) |
||
| Line 1: | Line 1: | ||
| − | <span style="font-size:180%">Current stable version is '''[https://github.com/NeuroMD/neuro-sdk/releases/tag/1. | + | <span style="font-size:180%">Current stable version is '''[https://github.com/NeuroMD/neuro-sdk/releases/tag/1.3 1.3]'''</span> |
| − | <span style="font-size:180%">Current stable version of extended SDK is ''' | + | <span style="font-size:180%">Current stable version of extended SDK is '''1.2'''</span> |
'''Previous versions''' | '''Previous versions''' | ||
| + | [https://github.com/NeuroMD/neuro-sdk/releases/tag/1.2 1.2] | ||
[https://github.com/NeuroMD/neuro-sdk/releases/tag/1.1 1.1] | [https://github.com/NeuroMD/neuro-sdk/releases/tag/1.1 1.1] | ||
[https://github.com/NeuroMD/neuro-sdk/releases/tag/1.0 1.0] | [https://github.com/NeuroMD/neuro-sdk/releases/tag/1.0 1.0] | ||
| Line 26: | Line 27: | ||
To link Base SDK library to your project add following line to your dependencies list | To link Base SDK library to your project add following line to your dependencies list | ||
<syntaxhighlight lang='bash'> | <syntaxhighlight lang='bash'> | ||
| − | compile 'com.neuromd.neurosdk:neuro-sdk:1. | + | compile 'com.neuromd.neurosdk:neuro-sdk:1.3.0' |
</syntaxhighlight> | </syntaxhighlight> | ||
To link Extended SDK library to your project add following line to your dependencies list | To link Extended SDK library to your project add following line to your dependencies list | ||
<syntaxhighlight lang='bash'> | <syntaxhighlight lang='bash'> | ||
| − | compile 'com.neuromd.neurosdk:neuro-sdk-ext:1. | + | compile 'com.neuromd.neurosdk:neuro-sdk-ext:1.2.0' |
</syntaxhighlight> | </syntaxhighlight> | ||
| − | |||
| − | |||
| − | |||
| − | |||
| − | |||
| − | |||
| − | |||
| − | |||
| − | |||
| − | |||
| − | |||
| − | |||
| − | |||
| − | |||
| − | |||
| − | |||
| − | |||
| − | |||
| − | |||
| − | |||
| − | |||
| − | |||
| − | |||
| − | |||
| − | |||
| − | |||
| − | |||
| − | |||
| − | |||
| − | |||
| − | |||
| − | |||
| − | |||
| − | |||
| − | |||
| − | |||
| − | |||
| − | |||
| − | |||
| − | |||
| − | |||
| − | |||
| − | |||
| − | |||
| − | |||
| − | |||
| − | |||
| − | |||
| − | |||
| − | |||
| − | |||
| − | |||
| − | |||
| − | |||
==Notes== | ==Notes== | ||
| Line 98: | Line 45: | ||
====Base SDK versions==== | ====Base SDK versions==== | ||
| − | '''Current release:''' <span style="font-size:120%">[https:// | + | '''Current release x86:''' <span style="font-size:120%">[https://drive.google.com/file/d/1o4YeZXD0zPXSa9sz6VWUUo7SMGQjqiXG/view?usp=sharing]</span> |
| + | '''Current release x64:''' <span style="font-size:120%">[https://drive.google.com/file/d/1s-g6YH_fTc72zJlnrCtnQ2IgQjcyuWxs/view?usp=sharing]</span> | ||
'''Previous versions:''' | '''Previous versions:''' | ||
| + | [https://yadi.sk/d/6tOVriie3ZkPX6 neurosdk-setup-win-x64-v1.2.exe] | ||
[https://yadi.sk/d/UiS8TgVU3ZPk7V neurosdk-setup-win-x64-v1.1.exe] | [https://yadi.sk/d/UiS8TgVU3ZPk7V neurosdk-setup-win-x64-v1.1.exe] | ||
Revision as of 02:36, 12 December 2018
Current stable version is 1.3
Current stable version of extended SDK is 1.2
Previous versions
1.2
1.1
1.0
0.17
0.16
0.15
Contents
Android
Android software development kit libraries for NeuroMD devices could be linked into project from JCenter repository, or could be downloaded as .aar files from server
JCenter repository
Extended SDK binaries could be obtained from JCenter repository. To use it, check if you have following lines in gradle script of your project
allprojects {
    repositories {
        jcenter()
   }
}
To link Base SDK library to your project add following line to your dependencies list
compile 'com.neuromd.neurosdk:neuro-sdk:1.3.0'
To link Extended SDK library to your project add following line to your dependencies list
compile 'com.neuromd.neurosdk:neuro-sdk-ext:1.2.0'
Notes
Constructor of DeviceScanner class needs Context object to get access to Bluetooth system service. All operations with Bluetooth data are performed in main UI thread of application, so doing too much work in it may cause connection issues and data packets loss.
Windows
Software development kit for Windows operating system is represented as native C++ libraries, C-wrapper libraies and C#-wrapper .NET assemblies. Supported operating systems is Windows 8.1 and 10. There is only 64-bit platform support now, 32-bit libraries is comming soon.
Libraries installer
Use the following links to obtain windows installers of SDK libraries and samples. This installers set environment variable NEUROSDK to the path where libraries are installed. Installed samples use this variable to get libraries and it can be used in custom projects configurations.
Base SDK versions
Current release x86: [1] Current release x64: [2]
Previous versions:
neurosdk-setup-win-x64-v1.2.exe neurosdk-setup-win-x64-v1.1.exe
Using CMake to create Visual Studio sample projects
Samples for native C++ SDK library and for C-wrapper library is made as CMake projects. To build and run them first you need to create VS projects. These projects require at least CMake of version 3.3.
1. Run CMake and point to needed sample directory
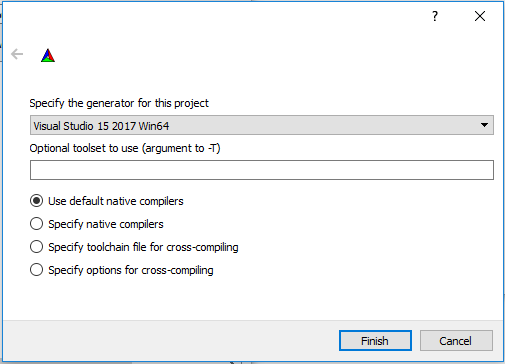
2. Press "Configure" and select Win64 generator, then press finish
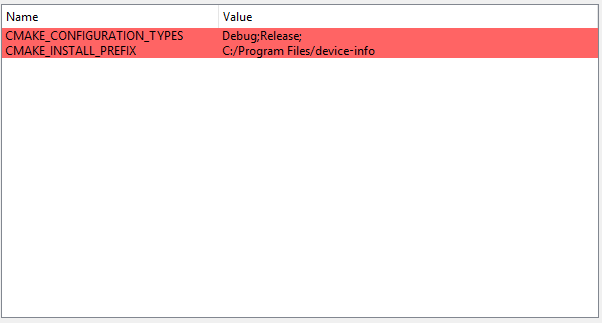
3. Remove redundant configuration types from config. Use Debug and Release only. Press "Configure" again
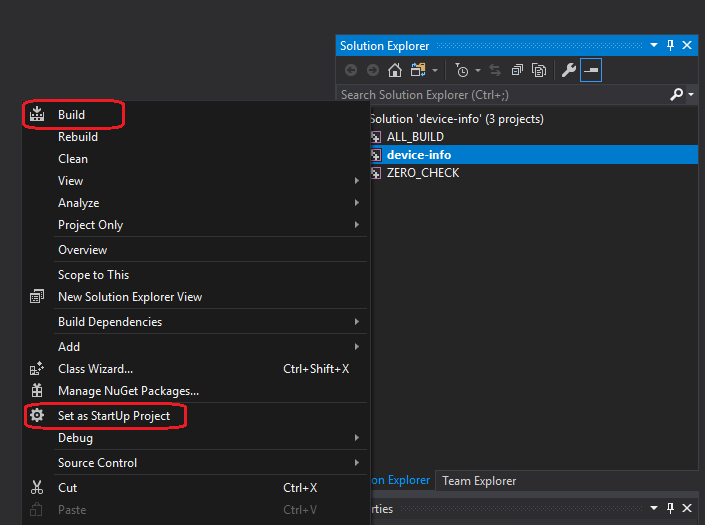
4. Press "Generate" and when generating is doe press "Open Project". Set runnable project as startup project and press "F6" to build it (or right-clict on project name in solution explorer and click "Build")
5. Press "F5" to run project


